Shaders in VTK: a cel-shaded skull example in 100 lines of Python code

So until last year, I never worked with shaders in VTK (the Visualization Toolkit). This was kind of sad actually, but I thought it would be super difficult, the need didn’t really arise and well, ain’t nobody got time for that! For our VIS 2016 submission though, I finally got to play around with them. And spoiler alert: it’s not that difficult and even kind of fun! Especially with a little help from highly intelligent co-authors 🙂

So today I would like to share a little Python example I made as a tutorial, featuring a cel-shaded (or toon-shaded if you’re one of those people) donut or skull in exactly 100 lines of code, probably half of them comments. Before we get started, a little sneak preview:
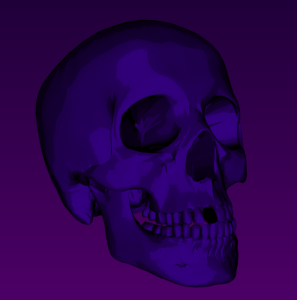

Cel-shaded Skull
Cel-shaded Skull
Cel-shaded Donut
Cel-shaded Donut

Right, so let’s get started! I’m using VTK version 6.3 built with the ‘old’ OpenGL backend and not the newer OpenGL2 one, in which custom shaders are handled in a different way. I’m using 64-bit Python 2.7 to go with this.  You can find the skull surface and code you need here: shaderfun.

VTK supports GLSL shaders that you can add to your vtkActors. The easiest way to do this is, in my opinion, by specifying your shaders as multi-line strings using triple quote block (”’ bla ”’ or “”” bla “””). You can define a vertex and fragment shader in this way. To get your shader to work with VTK, you need to define a propFuncVS in the vertex shader, and a propFuncFS function in the fragment shader. These are the ones we’re using today:

The vertex shader:

vert = """
    varying vec3 n;
    varying vec3 l;

    void propFuncVS(void)
    {
        n = normalize(gl_Normal);
        l = vec3(gl_ModelViewMatrix * vec4(n,0));
        gl_Position = gl_ModelViewProjectionMatrix * gl_Vertex;
    }
"""

The fragment shader:

frag = """
    varying vec3 n;
    varying vec3 l;

    void propFuncFS( void )
    {
        vec3 cl = vec3(.2,0,.5);
        vec3 light = normalize(l.xyz);
        float vdn = light.z;
        cl = round(vdn * 5) / 5 * cl;
        gl_FragColor = vec4(cl*vdn,1);
        if (vdn < 0.3)
        {
            gl_FragColor = vec4(vec3(0),1);
        }
    }
"""

Once you made some shaders, you want to add them to your vtkActor so that VTK knows which objects to shade. First you make a vtkShaderProgram2 and set its context to your render window. Then you make a vtkShader2 for every shader you made, e.g., one for the vertex shader and one for the fragment shader, set the source codes to your multiline GLSL strings. and set their context to that of the vtkShaderProgram2. Now you can add the shaders to the program. You get the OpenGL property of your actor and call SetPropProgram to attach your shader program to the actor. Finally, just set the Shading to On of your property and you are good to go! Did I make it sound difficult? It’s not, here’s the relevant code:

# Now let's get down to shader-business...
# First we make a ShaderProgram2 and set it up on a date with the RenderWindow
pgm = vtk.vtkShaderProgram2()
pgm.SetContext(renWin)

# For both the vertex and fragment shader, we need to make a Shader2
# Also set them up with the RenderWindow, by asking the ShaderProgram2 for an introduction
shaderv = vtk.vtkShader2()
shaderv.SetType(vtk.VTK_SHADER_TYPE_VERTEX)
shaderv.SetSourceCode(vert)
shaderv.SetContext(pgm.GetContext())
shaderf = vtk.vtkShader2()
shaderf.SetType(vtk.VTK_SHADER_TYPE_FRAGMENT)
shaderf.SetSourceCode(frag)
shaderf.SetContext(pgm.GetContext())

# Now we add the shaders to the program
pgm.GetShaders().AddItem(shaderv)
pgm.GetShaders().AddItem(shaderf)

# And tell the actor property that it should totally use this cool program
openGLproperty = actor.GetProperty()
openGLproperty.SetPropProgram(pgm)
openGLproperty.ShadingOn()

That’s it for my basic tutorial on how to use shaders in VTK. If people are interested, I could make a more elaborate tutorial on how to pass attributes, use textures, and scalar mesh properties in your VTK shaders 🙂 Hope this was helpful!
Colormaps in Medical Visualization

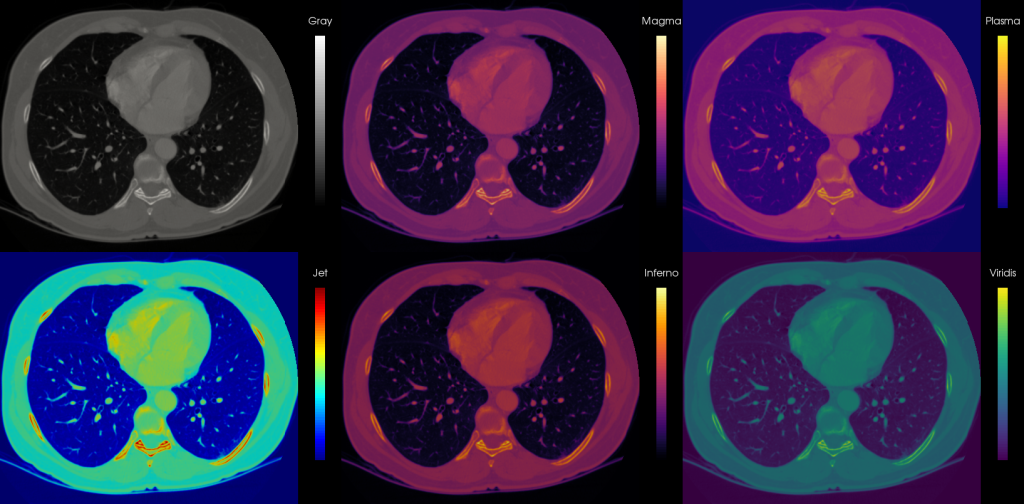
So I guess we all know rainbows are bad, mmmkay. That’s why I wrote a lengthy blogpost for medvis.org and more recently a follow-up featuring four new pretty colormaps designed for Matplotlib. I realized though that I did not see the prettiness applied to medical datasets so I went to town with Paraview 5.0 (which includes the new colormaps by default now). I took these colormaps for a spin on a slice of the CALIX dataset from the OsiriX dataset collection, an arterial phase CT scan of the abdomen (and part of the thorax as you see below). I wanted to put the four new colormaps (Magma, Inferno, Plasma, and Viridis) side-by-side with the traditional grayscale and Jet (AKA rainbow) colormap to show what they look like on a medical dataset:

Medical Visualization Colormaps
Medical visualization colormaps: CT thorax

Looks kind of artistic, am I right? I would totally buy a print and frame it! So the gray scale is doing fine of course, and what we are accustomed to in medical images. The banding in the Jet colormap focuses the attention on the vertebra and ribs, which is probably not what you are actually interested in. Also information is lost in the soft tissue areas (muscle and fat). The four proposed colormaps are doing fine, though Plasma and Viridis start from blue tones, which is probably not what you expect when viewing on a black background, but can work well in case the low intensity regions contain information you actually want to show on a black background. I would love to compare with Matlab’s Pareto, but hey, proprietary, what’s a girl to do ^^

Now, of course, there is not much reason to replace the gray map when viewing single modality medical imaging data, but it could be interesting to consider for multimodal fusion viewing. For instance, when PET and CT are combined (either from a hybrid scanner or by software registration), often the anatomical CT data is represented in a gray colormap, while the functional metabolic information from the PET is shown overlaid in a color colormap (lol). This works well because both colormaps can be perceived simultaneously very well. For this, often a heated-body colormap is used, but you could also consider these four new options, as this is not a standardized choice and varies per manufacturer.

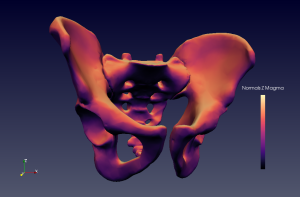
So far I’m talking about 2D representations, such as the traditional slice views above. When rendering 3D scenes though, and for instance wanting to map a scalar value on a surface to a color, one should be careful with these new maps. Since they are not iso-luminant, the changes in luminance may interfere with surface shading from lighting. Let’s take a look at a silly example:

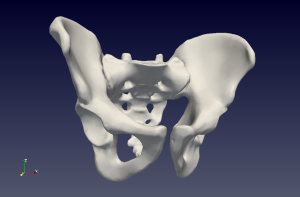
os coxae magma colormap 3d
Os Coxae surface normals in Z direction mapped to colormap Magma

This is a bit of a stupid example, because I don’t have proper data I can show you (I am only working with the most top-secret rectum information). But what we see here is a surface model of the os coxae with the normal Z component mapped to the Magma colormap. So what’s shading and what’s normal information in this case? Who’s to say? I am obviously:

Os coxae standard shading

So this is why you need iso-luminant colormaps for 3D surface information mapping, kids! Also, consider the Plasma, Inferno, Magma and Viridis for your 2D visualizations because:

  • They are beautiful
  • They are colorblind safe
  • They are printer-friendly (this means printers become happy when you print them (j/k, it means when you print grayscale it still works))
  • They are perceptually linear

Even cheaper standing desk at IKEA

As I previously mentioned, IKEA used to sell reasonably priced automatically adjustable standing desks in the IKEA Bekant series. They recently introduced a new series though, that is even more affordable. For 200 euro, you can now get a Skarsta adjustable sitting / standing desk. You can also upgrade to a slightly larger version for 30 euros more. I think this is the smaller version shown here:

Ikea's latest standing desk: the Skarsta
Ikea’s latest standing desk: the Skarsta

What’s the catch, you may be wondering? Well the catch is that the Skarsta requires manual, eh, cranking? to adjust the position:

SKARSTA Bureau zit/sta IKEA
You crank that desk, boy!

We have tested the desk for about two weeks now here at home, and it’s working like a charm! Bonus points for the arm workout involved ^^.

Update: For those wanting more tech details on this table (which seems to be a lot of you, judging by the comments section 😉 Cam Dore just shared this useful link to the manual in the comments. Thanks!

My Medical Visualization Software Development Setup and Tech Stack

Right, I’ll be the first to admit I’m kind of a lazy software developer. Sure, if I really need to, I’ll build something myself, but I’ll take no pleasure in it. At all! I use Windows and am no longer ashamed to admit it. I’m always a happy camper when other people decide to make binaries available (thank you other people!). In this post I’ll summarize my current setup including the links to the binaries. This is mainly a reference for future me, in case I need to re-install somewhere, but hopefully other people will find it helpful as well. So here is a list of the things I can’t develop without: